
Hello lovely peeps
It's time for a new 'Anything Goes' challenge at Polkadoodles, with the optional theme of Christmas.
I was lucky enough to receive the gorgeous new Christmas stamps and co-ordinating CD which Nikky launched last Friday on Create and Craft, so I have used these for my inspiration card.
I was a bit stumped again this week on how to I was going to physically make my card. I wanted to combine a stamped poinsettia with one of the background papers from the CD, but I knew my hand/elbow wouldn't be up to cutting out the flowers for layering on top. Luckily, Pebeo drawing gum came to the rescue (more on that in a minute).
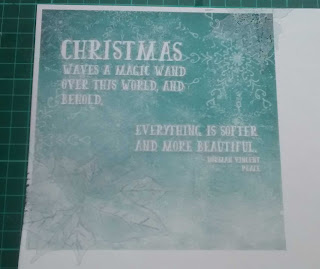
To start off, I dragged the turquoise snowflake paper into CraftArtist and sized it to 6"x6". I then brought in one of the lovely sentiments and converted it from black to white before splitting it into two halves and positioning it over the paper. I printed the project in black and white onto copy paper to make sure it was the right size for my card.

I laid the copy paper over the top of some watercolour card and drew some lines around where the blocks of text were, leaving slight indentations on the watercolour card underneath. Now that I knew where my poinsettias could go, I started stamping.
The set doesn't include a poinsettia flower, but you get three different leaf/petal shapes to 'build' your own. I used the largest leaf/petal first, stamping it onto the watercolour card with Dove Grey Stazon. Since the petals needed to overlap I needed to mask some of them off, and this is where the Pebeo Drawing Gum comes in.

After I had stamped each petal I painted the gum over the top and waited a few minutes for it to dry before doing the next one. Although this was quite time consuming it did give my elbow some much needed rest periods*. Obviously, if your hands are up to it, it is a lot quicker to cut out masks from sticky notes.
* I am under strict instructions from my physiotherapist not to overdo it. Spoilsport ;D


It's time for a new 'Anything Goes' challenge at Polkadoodles, with the optional theme of Christmas.
I was lucky enough to receive the gorgeous new Christmas stamps and co-ordinating CD which Nikky launched last Friday on Create and Craft, so I have used these for my inspiration card.
I was a bit stumped again this week on how to I was going to physically make my card. I wanted to combine a stamped poinsettia with one of the background papers from the CD, but I knew my hand/elbow wouldn't be up to cutting out the flowers for layering on top. Luckily, Pebeo drawing gum came to the rescue (more on that in a minute).
To start off, I dragged the turquoise snowflake paper into CraftArtist and sized it to 6"x6". I then brought in one of the lovely sentiments and converted it from black to white before splitting it into two halves and positioning it over the paper. I printed the project in black and white onto copy paper to make sure it was the right size for my card.

I laid the copy paper over the top of some watercolour card and drew some lines around where the blocks of text were, leaving slight indentations on the watercolour card underneath. Now that I knew where my poinsettias could go, I started stamping.
The set doesn't include a poinsettia flower, but you get three different leaf/petal shapes to 'build' your own. I used the largest leaf/petal first, stamping it onto the watercolour card with Dove Grey Stazon. Since the petals needed to overlap I needed to mask some of them off, and this is where the Pebeo Drawing Gum comes in.

After I had stamped each petal I painted the gum over the top and waited a few minutes for it to dry before doing the next one. Although this was quite time consuming it did give my elbow some much needed rest periods*. Obviously, if your hands are up to it, it is a lot quicker to cut out masks from sticky notes.
* I am under strict instructions from my physiotherapist not to overdo it. Spoilsport ;D

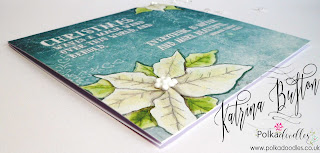
Once I'd finished building the flowers, I printed my backing paper and sentiment over the top of the watercolour card (I used 160gsm because my thicker watercolour card will not go through my printer).

Dab off any remaining printer ink from the masked flowers and then rub off the drawing gum.

I added some definition to my poinsettias by painting them with Spectrum Aqua markers
(Jasmine, Moss and Black)

I cut this down and glued it onto a 6"x6" card blank, and added a bit of sparkle with a Wink of Stella pen.

The centres are polystrene balls from my old beanbag which I glued on with Cosmic Shimmer.

I would like to enter this in the following challenges:-
That's Crafty! Challenge Blog Christmas in September
Winter Wonderland two Dies and or Add some Sparkle
Addicted to Stamps and More #212 Make your mark
Inspiration Destination #104 Always Anything Goes
Crafting from the Heart #128 Anything Goes
World Wide Open Design Team Challenge 14 Anything Goes
Thanks for stopping by,
Katrina x


